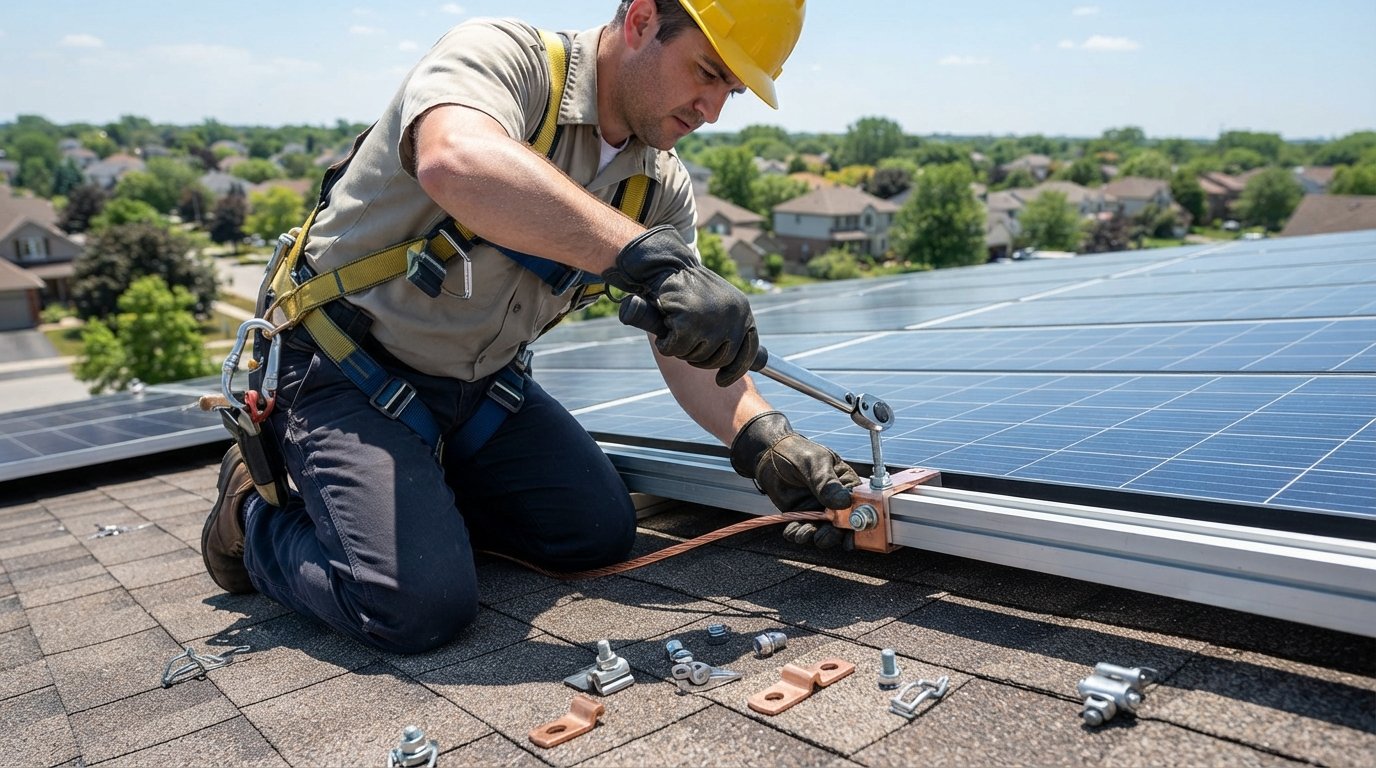
How to Properly Ground a Solar Array on a House
Ground your solar array correctly to pass inspection and ensure safety. Call (833)-434-4023 for expert guidance on code-compliant grounding.

By Ryan Brooks
Learn more about Solar Panel Installation and Repair for guides, costs, and what to expect.
Compare Solar Panel Installation and Repair Pros Near You

Enter your ZIP code to compare top-rated local professionals and request free quotes.
Grounding a solar array is one of those tasks that seems simple until you are standing on a roof with a torque wrench, a roll of bare copper, and a nagging feeling that the inspector will not see it your way. The truth is that proper grounding is not just a box to check: it is the backbone of a safe, code-compliant, and durable solar installation. Whether you are a homeowner verifying a contractor's work or a DIY enthusiast tackling a small array, understanding the principles and pitfalls of solar grounding can save you from failed inspections, equipment damage, and serious safety hazards.
This guide walks you through the essential steps to properly ground a solar array on a house, from the why to the how, with a focus on the National Electrical Code (NEC) and practical field tips. We will cover the role of grounding in lightning and surge protection, the components involved, common mistakes that trip up even experienced installers, and when it is time to call in a professional. By the end, you will have a clear roadmap to ensure your solar array is grounded correctly and safely.
Why Grounding Your Solar Array Is Non-Negotiable
Grounding serves two critical purposes: safety and performance. First, it provides a low-resistance path for fault currents, preventing metal components from becoming energized and posing a shock hazard. If a live wire accidentally contacts the array frame or mounting rails, the ground connection ensures that the circuit breaker trips quickly, minimizing the risk of electrocution or fire. Second, a properly grounded system helps dissipate lightning-induced surges and static electricity, protecting your inverter and other sensitive electronics from damage.
Solar arrays are particularly vulnerable because they are elevated, exposed, and often the tallest structure on a residential property. A nearby lightning strike can induce massive voltage spikes in the wiring, and without a robust grounding system, that energy can arc across components, start a fire, or destroy your solar investment. Moreover, many homeowners insurance policies require proof of code-compliant grounding, and inspectors will not sign off on a system that lacks it. In short, grounding is not optional: it is a fundamental requirement for any grid-tied or off-grid solar installation.
NEC Grounding Basics for Solar Arrays
The National Electrical Code (NEC), specifically Article 690 for solar photovoltaic systems and Article 250 for grounding and bonding, lays out the requirements for a safe installation. While the code is lengthy, the core concepts can be distilled into a few key practices that apply to residential rooftop arrays.
At its heart, the NEC requires that all exposed metal parts of the array (module frames, mounting rails, inverter enclosures, and conduit) be bonded together and connected to the grounding electrode system of the house. This creates an equipotential zone, meaning all metal parts are at the same electrical potential, eliminating dangerous voltage differences. The equipment grounding conductor (EGC) is the wire that ties everything together, and it must be sized appropriately based on the overcurrent protection device rating. For most residential systems, a 10 AWG or 8 AWG bare copper conductor is common, but always consult the code and local amendments.
Bonding is the act of connecting metal parts to each other, and it is just as important as the ground connection itself. Module frames must be bonded to the rails using listed bonding hardware, such as star washers, bonding clips, or dedicated grounding lugs. Rails must be bonded to each other and to the EGC. The inverter, combiner box, and disconnects also need bonding. The EGC then runs to the main service panel's ground bus, which is tied to the grounding electrode conductor (GEC) and ultimately to the earth via ground rods or metal water pipes. The NEC also requires a separate equipment grounding conductor to be run with the solar circuit conductors, not just relying on conduit as a ground path.
One common point of confusion is the difference between grounding and bonding. Grounding refers to the connection to earth, while bonding ensures all metal parts are electrically connected. Both are necessary for a safe system. Another key requirement is that the array's grounding system must be bonded to the building's existing grounding electrode system. You cannot simply drive a new ground rod for the solar array and call it a day; all grounds must be interconnected to avoid voltage gradients.
Step-by-Step Guide to Grounding a Solar Array
Properly grounding a solar array involves a systematic approach that starts with planning and ends with verification. Below is a step-by-step framework that aligns with NEC requirements and industry best practices. Note that this is a general guide: always consult the latest code edition and local jurisdiction requirements, and consider hiring a licensed electrician for the final connections.
- Design the grounding system before installation. Determine the equipment grounding conductor size, the bonding method for modules and rails, and the route to the main service panel. Check local amendments and utility requirements. Use a grounding calculator or consult NEC Table 250.122 for conductor sizing.
- Bond module frames to the mounting rails. Use listed bonding hardware such as WEEB washers, grounding clips, or lay-in lugs. Ensure each module is bonded at least once, and follow the manufacturer's torque specifications. Do not rely on the mounting clamps alone unless they are listed for bonding.
- Bond rails together and to the equipment grounding conductor. Connect rails using listed bonding jumpers or grounding lugs. Run a continuous bare copper EGC along the array, securing it with clips and connecting it to each rail with irreversible connections (e.g., compression lugs or exothermic welding).
- Ground the inverter and other equipment. Bond the inverter enclosure, combiner box, and disconnects to the EGC. Use listed lugs and ensure paint or anodizing is removed to bare metal for good contact.
- Route the EGC to the main service panel. Run the EGC alongside the current-carrying conductors, securing it every 4.5 feet and within 12 inches of boxes. Connect it to the ground bus in the main panel. Do not splice the EGC unless using irreversible splices.
- Verify continuity and resistance. Use a multimeter to check continuity between all metal parts and the ground bus. Perform a ground resistance test if required by local code. Document the results for the inspector.
Each of these steps must be executed with care. For example, bonding hardware must be rated for outdoor use and compatible with the metals involved to prevent galvanic corrosion. Aluminum rails and copper conductors can corrode when in direct contact, so use bimetallic lugs or stainless steel washers as separators. Also, ensure that the EGC is protected from physical damage, especially where it runs down the roof and along the exterior wall. Use conduit or raceways where necessary.
After installation, it is wise to perform a visual inspection and a continuity test before the system is energized. Many inspectors will check for proper bonding at each module and rail, the presence of a continuous EGC, and the connection to the main grounding electrode. Keeping a detailed record of your work, including photos and test results, can streamline the inspection process.
Common Grounding Mistakes That Fail Inspections
Even experienced installers can overlook details that lead to failed inspections or unsafe conditions. Here are some of the most frequent grounding mistakes and how to avoid them.
- Using the wrong bonding hardware. Not all washers and clips are listed for grounding. Using generic hardware can result in a poor connection that corrodes or loosens over time. Always use components listed to UL 2703 or equivalent.
- Relying on mounting clamps for bonding. Many mounting clamps are not listed for bonding, and the anodized coating on rails can insulate the connection. Use dedicated bonding hardware or listed clamps.
- Inadequate conductor sizing. Undersized EGC can overheat during a fault. Follow NEC Table 250.122 and account for voltage drop over long runs.
- Failing to bond all metal parts. Isolated metal components, such as unused rails or conduit, can become energized. Bond everything that could potentially carry fault current.
- Poor connection to the grounding electrode system. Connecting the EGC to a separate ground rod without bonding to the main system creates a dangerous voltage gradient. Always tie into the building's existing grounding electrode system.
- Corrosion from dissimilar metals. Direct contact between copper and aluminum can lead to galvanic corrosion. Use bimetallic connectors or stainless steel hardware to separate them.
These mistakes are common because they often pass a casual visual inspection but fail under the scrutiny of a trained eye or a multimeter. For instance, a bonding washer might look secure, but if it is not listed for the purpose, it may not maintain a low-resistance connection over years of thermal cycling. Similarly, a ground rod installed solely for the solar array might measure low resistance, but without bonding to the main system, it can create a difference in potential that is hazardous during a lightning strike.
To avoid these pitfalls, develop a checklist based on NEC requirements and manufacturer instructions. Take photos of each bonding point and connection before closing up panels or conduit. If you are unsure about a component's listing, consult the manufacturer's data sheet or ask your local inspector. Many jurisdictions offer pre-inspection consultations that can catch issues early.
When to Call a Professional (and What You Can Inspect Yourself)
While some homeowners may feel comfortable inspecting their existing grounding system, installing or modifying it is a task that should be left to licensed electricians or certified solar installers. The risks of improper grounding include electric shock, fire, and voided warranties. Moreover, many jurisdictions require permits and inspections for solar installations, and DIY work may not be allowed. If you are considering a DIY installation, check with your local building department first.
That said, homeowners can and should perform periodic visual inspections of their grounding system. Look for loose or corroded connections, damaged conductors, and signs of overheating. Ensure that the EGC is intact and securely fastened. If you notice anything amiss, contact a professional. Also, if you are buying a home with an existing solar array, as we discuss in our guide I Bought a House with Solar Panels, Now What?, it is wise to have the grounding system evaluated by a qualified inspector.
For professional installations, SolarEnergy.ai can connect you with vetted solar pros in your area who specialize in code-compliant grounding and full system design. Their network includes licensed electricians who understand local codes and can ensure your array is properly grounded and safe. You can also use their solar savings calculator to estimate your potential savings and understand the financial benefits of a professionally installed system.
When it comes to the final connection to the main service panel, it is almost always best to hire a licensed electrician. They have the tools and expertise to safely open the panel, verify the grounding electrode system, and make irreversible connections that meet code. An electrician can also perform the necessary tests, such as a ground resistance test, and provide documentation for your records. For those seeking comprehensive solar solutions, NewSolarQuotes offers independent educational resources and can help you compare quotes from qualified installers, ensuring you get a safe and reliable system.
Ultimately, proper grounding is a collaborative effort between careful planning, quality components, and skilled execution. By understanding the principles and common pitfalls, you can ensure that your solar array is grounded correctly, whether you are doing the work yourself or overseeing a contractor. Remember, safety first: when in doubt, call a professional.
Learn more about Solar Panel Installation and Repair for guides, costs, and what to expect.
Compare Solar Panel Installation and Repair Pros Near You
Enter your ZIP code to compare top-rated local professionals and request free quotes.